If you’re thinking about putting up a fence this summer, the first challenge is finding one that appeals to you. Although it’s easy to fall into a rut and put up the same stodgy stockade or plain picket your neighbors have, there’s no reason to compromise.
Start with the four distinctive fences we detail here—you can find even more when you’re out for a drive or browsing through books and catalogs. Look for a design that works with the style of your home and deals with the practical issues of neighbors, privacy, pets, sound, wind, landscaping and the very real need to stake out your boundaries.
Whichever one you decide on, keep these fence-building basics keep in mind:
•All fences use the same basic components: vertical posts set into the ground and horizontal rails that support either pickets, fence boards or lattice panels. They are spaced between 6 and 8 feet apart, depending on fence height and design.
•Fences must withstand year-round exposure to the elements. So, you should use redwood, cedar or pressure-treated pine. These woods offer the best protection against damage from rot and insects. Be sure to assemble the parts with weather-resistant fasteners, such as hot-dipped galvanized or stainless-steel nails and screws.
•You can buy prefabricated fencing sections at most lumberyards and home centers to save you some sawing and assembling. But, ready-made panels are available in a limited number of styles, and often are made of untreated pine, which won’t survive outdoors for long. If you choose prefab fencing make sure it’s made of redwood, cedar or pressure-treated pine.
•Most fences are painted or stained, but paint is a mixed blessing. There are few things as pretty as a freshly painted fence—or as ugly as a peeling one. If you plan to paint your fence, expect to invest lots of time scraping, sanding, priming and repainting every five to seven years. Always prime the bare wood first, then apply the best-quality exterior paint you can afford.
•A labor-saving alternative is exterior semitransparent stain. It’s the most durable, and when it fades, you can usually brush more on top without any sanding or scraping. You can also leave redwood or cedar unfinished and allow it to weather naturally to a soft, silvery gray. If so, apply a clear wood preservative every year to keep the fence from splitting and cracking.
•Never apply a clear topcoat finish, such as polyurethane varnish or shellac, to an outdoor project. Sun and rain will eventually blister the finish, leaving you no choice but to sand the entire surface and start from scratch.
•A building permit usually is not required to build a fence, but check with your local building department to be sure. Also ask about any requirements for materials, picket spacing, setback distances from property lines and posthole footings. The depth of the footings depends on the frost line in your area, which you can find out from the local building inspector.
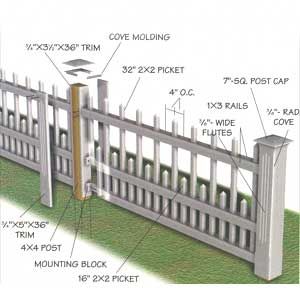
Appealing Pickets
Not every picket fence is an endless parade of pointy 1x3s (see photo 2). The classic design of this formal picket is based on Federal-style architecture, popular in America during the late 1700s. Along with fluted posts, it features pickets at different heights that create two fences in one design. The shorter, 16-inch-tall pickets mimic the low border fence commonly used around flower beds and gardens. The taller, 32-inch pickets form a traditional boundary fence typically found along property lines.
The 5-inch-square posts are made of pressure-treated 4x4s sheathed in 1-by trim boards. The 2×2 pickets are sandwiched between three pairs of 1×3 horizontal rails—a construction detail that allows water to drain through so the fence is far less likely to rot.
Construction. Begin by digging the postholes with a shovel or posthole digger. (If the fence is long and you have to create lots of holes, consider renting a power auger or hiring a landscape contractor who has one.) Space holes 7 feet on center and— as for all the fences covered here—dig them 24- to 30-inches-deep. Line the holes with 4 inches of gravel, set in the 4×4 posts and then tamp down dirt around them. For posts that support a gate or are freestanding at the end of the fence, you’ll need to pour a concrete footing: Dig the hole below the frost line, add 4 inches of gravel, set in the post, brace it and fill the hole with concrete.
Once the posts are in, cut trim boards to fit on all four sides of each one. Rout the decorative flutes and cove detailing shown in the drawing, then nail the boards to the posts. Next, preassemble the pickets and rails into panels. Space the pickets 4 inches on center (check with your building department to be sure this spacing meets code). Cut short sections of 2x2s and screw them to the inside of the posts to serve as mounting blocks. Then slip the panels down between the posts and over the blocks, and secure them with nails or screws driven through the ends of the 1×3 rails and into the blocks. Finally, attach the caps and cove molding to the tops of the posts.
Cross-Rail Thoroughbred
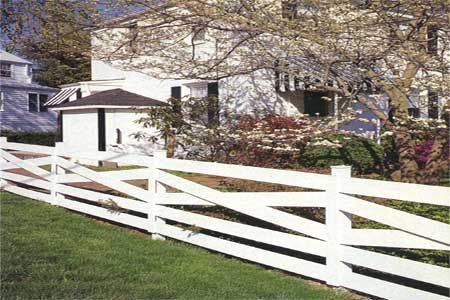
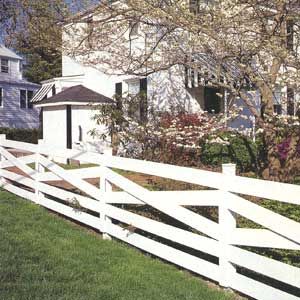
This white-painted fence features a repeating crisscross pattern that makes us think of a horse farm (see photo 1). It’s also relatively easy to build. The major components are pressure-treated 4×4 posts, 1×6 rails and 1×4 trim boards. Each section is 8 feet long, but you can reduce its overall scale by using narrower lumber and shorter posts spaced closer together.
Construction. Space the postholes 8 feet on center, then set the posts in the holes and backfill around them. Be sure the posts are perfectly plumb before compacting soil around each one with a spare 2×4.
Next, secure the horizontal 1×6 rails to the posts with 8d galvanized common nails. Keep the bottom rail at least 2 to 3 inches above the ground. Leave a 2 3/4-inch space, then attach the second rail from the bottom. Nail the upper rail 4 inches down from the tops of the posts. When nailing near the ends of the rails, bore pilot holes to prevent the boards from splitting.
Miter-cut the ends of the 1×6 cross rails so they span from the center of one post to the center of the next. They should fit snugly between the upper and second rails. Bore pilot holes in the rails, then nail them to the posts.
Cut 40-inch-long 1×4 trim boards and nail one to each post directly over the joints where the rails meet. You can also use galvanized deck screws instead of nails so the trim boards can be easily removed for repair or repainting.
Protect the top of each post with a preformed metal cap to block out water and reduce the chance of cracking. The caps are available at home centers and lumberyards.
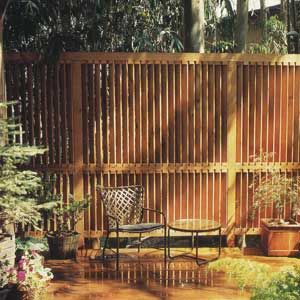
Slat Fences
A series of closely spaced 1×4 slats gives this intricate redwood fence the look of a partially open blind (see photo 3). The panels shown in the illustration measure a little over 12-feet-wide. The fence is divided horizontally into two tiers: The shorter, lower tier of slats fits between two 2×4 rails; the taller, upper tier is installed between the middle 2×4 rail and a 4×4 top rail.
The rails are toenailed to four 12-foot-long 4×4 posts that protrude 8 feet out of the ground. At one end of the privacy screen, the fence drops down to a height of 37 1/2 inches.
Construction. Set the four posts to create a 72-inch-wide center section of slats flanked by 36-inch-wide sections. The tops of the posts should be level and at the same height.
Next, toenail the horizontal 4×4 top rail to the tops of the posts. Cut the 2×4 rails to fit between the posts and toenail them in place. Then use a power miter saw or radial-arm saw to cut the small, angled spacer blocks. Set the saw blade to 45° and cut the blocks 11/2 inches wide from 2×4 stock. Bore a pilot hole through each one for an 8d galvanized finishing nail. Because the middle 2×4 rails have spacer blocks nailed to their top and bottom surfaces, be sure to offset the pilot holes so the nails don’t collide.
To assemble, nail a spacer block to the underside of the top rail and to the upper surface of the middle rail. Run a bead of construction adhesive along the blocks’ sides, install a 1×4 slat, then lay another adhesive bead across the surface of the slat at each end. Press the next pair of blocks tightly against the slat and nail them in place; install the remaining slats the same way.
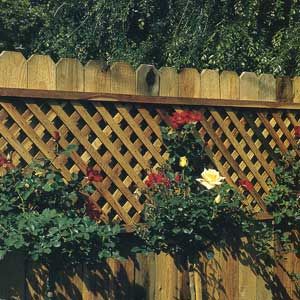
Lively Lattice
This 7-foot-tall privacy fence is perfect for any backyard gardener looking for a place to plant climbing flowers and creeping vines (see photo 4). Long, horizontal lattice panels near the top of the fence provide support for clinging plants. Each panel consists of a 2×8-foot piece of diagonal lattice set into a 2×4 frame. The frame pieces are grooved to accept the 1/2-inch-thick lattice.
Construction. To start, set 4×4 posts 8 feet on center. Leave 80 inches of the posts sticking out of the ground. Then screw horizontal 2×4 rails between the posts. Position the upper rail approximately 4 to 6 inches. from the top of the posts and the lower rail about 6 inches above the ground.
Next, cut off the upper corners of the 1×6 fence boards at a 45-degree angle to create the dog ear 3/4 design shown. Fasten the 1x6s to the 2×4 rails with 6d galvanized nails.
With the basic fence in place, cut the 1/2×1/2-inch grooves for the lattice panels into the 2x4s. The quickest, easiest way is on a table saw with a dado blade, but you can also use a router or even a portable circular saw. Prefabricated lattice comes in 4×8-foot sheets; most home centers and lumberyards carry both diagonal and square pattern types. Rip the sheets in half lengthwise with a circular saw or sabre saw.
Assemble the lattice panels by screwing together the three parts of the 2×4 frame, fastening the 26-inch-long end pieces to the 95-inch-long frame top. Then carefully insert the lattice panel, making sure it fits into the grooves. Slip on the bottom of the frame and screw it in place.
To secure the assembled lattice panels to the fence, simply screw through the back of the 1×6 fence boards and into the 2×4 frame. Use at least six 2-inch galvanized deck screws per panel. On the fence shown in the photo, the panels are located about 6 inches down from the top. But you can fasten them anywhere along the fence, including close to the ground for support of creeping ground-cover plants.