You rarely notice one, but it has a big impact on every room. In fact, you look right at it when you do sit-ups or lie down for a nap. Give up? It’s the ceiling. And stepping up to one of the seven improvements we’ll cover here is one of the easiest and most effective ways to give a room a face-lift. It’s also a great solution for a cracked or badly stained ceiling. And all of these treatments can be accomplished in a weekend or two by a homeowner with moderate skills. Redoing a ceiling is also a great opportunity to fix some basic design flaws. A room with a high, formal ceiling can feel cozier when topped with a warm or dark color. Lighter ceiling shades visually enlarge a space, as do patterns or colors similar to those on walls. Keeping things proportional is generally a good idea — save the grandly scaled patterns for oversize rooms, and the dainty tiles or textures for tiny spaces. No matter which upgrade you choose, you need to make general repairs to a damaged ceiling. For plaster, use plaster washers, available from Charles Street Supply and others, to snug up sagging areas where plaster “keys” are broken off behind the lath. If you’re using a hard covering (wood, tin, fiber planks or a suspended ceiling) you won’t need to repair most cracks. But if they are more than a hairline or run the length of the room, investigate their cause before covering them up. Ceilings that will get partial treatments (medallion and layered drywall) or soft coverings (wallpaper) should be repaired and cleaned with diluted TSP, or trisodium phosphate. Repair cracks with drywall tape and mud, and thoroughly cover stains with a white shellac-based product like B.I.N. In most cases, you’ll be attaching the new ceiling to joists underneath the surface of the existing ceiling, so locating the joists is an important first step. If your home was built or remodeled before 1980 and the existing ceiling is covered with sprayed acoustical material or acoustical tiles, have a sample checked for asbestos. A positive test is the signal to call in a professional abatement contractor to remove the old ceiling.
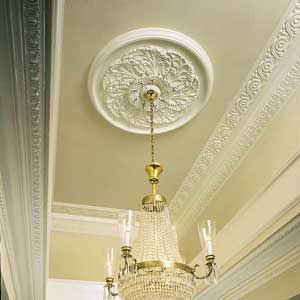
Ceiling Medallion
Installing a ceiling medallion is the least time-consuming project described here; it’s also the only one you can easily do by yourself. Though heavy cast-plaster roundels are still made for restoration work, lightweight versions of polyurethane foam from makers like Focal Point, Style-Mark and Fypon are easier to handle. Style-Mark’s versions, for instance, range from 12 to 31 in. dia. and weigh just ounces; they cost $25 to $85 at home centers and lumberyards. They’re used to draw attention to chandeliers and light fixtures, to enhance molding and/or columns or just to liven up a plain-Jane ceiling. Medallions don’t necessarily have to go solo; try using a row of smaller ones in a long, narrow room or hall. To attach a ceiling medallion, apply a urethane adhesive to the piece, then place it in the desired location on the ceiling. Secure the medallion by countersinking nails or screws spaced several inches apart. Fill in any indentations with spackle. The final step is to paint the medallion with either a latex or oil-based paint.
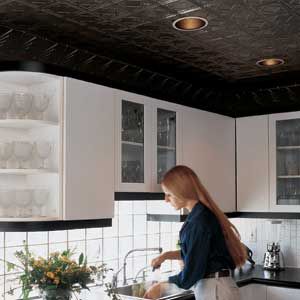
Pressed-Tin Panel
Pressed-tin panels have become extremely popular over the past decade; there are about 10 different companies currently manufacturing them. While these patterned-metal sheets complement older homes and loft apartments well, their folksy feel probably doesn’t suit a modern, angular interior. Nor are they a good choice for any room in which good acoustical quality is imperative. “If you’re going to use tin panels, you need a rug or drapes in the space to absorb reverberating sound,” explains Glen Eldridge, owner of Houston-based Chelsea Decor-ative Metal Company. It’s best to have a helper when installing the panels, which usually come in 2×4-ft. sheets weighing 4 lbs. each. You’ll need to nail up furring strips around the perimeter of the ceiling and space them every 12 in. on center in the field. The tin panels can then be attached with 1-in. common nails to the strips with a nail gun or a hammer. Overlapping metal edges are designed to be “swedged” together. Eldridge recommends using tin snips for any pruning that’s needed to accommodate vents, speakers or light fixtures. If you’re planning to paint the panels, use an oil-based paint; to avoid chipping, paint after the panels have been installed. Use a deep-nap roller to apply the paint. Then, if you like, add accent colors with a brush. You can also seal the panels with clear polyurethane. Panels come in many different patterns and start at $18 per 2×4 sheet; tin cornices, molded fillers and lay-in panels for suspended ceilings are also available.
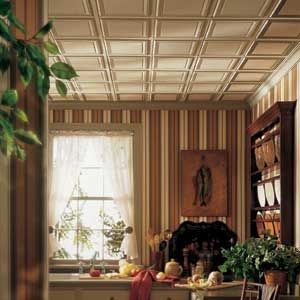
Wallpaper
Wallpapering a ceiling can be tricky, but it’s by far the most versatile treatment discussed here. Paper suits flat, sloped and irregularly shaped ceilings, and the vast array of patterns and textures on the market makes for endless design possibilities. Answers to the following design-related questions will help you settle on a pattern and color. Does your house have exposed beams, skylights, or some other ceiling feature to which you want to draw attention? Pick a bold color or pattern. Do you wish the room in question were larger or smaller? Then select a light or dark color accordingly. Is your ceiling sloped or irregular? Choose a solid or scattered-pattern paper rather than a stripe or plaid. Home improvement centers and wallcovering and paint stores usually sell wallpaper by the 26-sq.-ft. roll. Prices start as low as $3 per roll and go up to $180 or more. Papering walls is usually a one-person job, but for ceilings it’s better to have two people—one to smooth out the paper while the other holds the rest of roll at the ready. Other than that, the process isn’t much different from papering walls. You can use unpasted or prepasted paper, which has a postage stamp-like backing that activates when wet. If you’re commitment-shy, buy strippable paper—it’s easier to remove. If you’re planning to install paper on the walls, do the ceiling first and then overlap the top of the walls by 1/2 in. Butt the wall sections into the junction of wall and ceiling. This will creates a straight seam. If both papers match, the seam will be invisible.
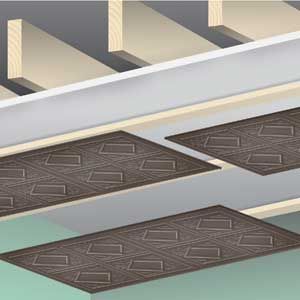
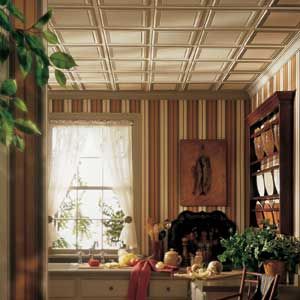
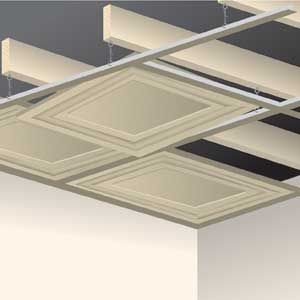
Suspended-grid ceiling
If there are exposed pipes, ducts or electrical connections in the ceiling you want to make over, a suspended-grid system may be your best bet. A 10×12-ft. package from Armstrong, using mineral-fiber panels (the cheapest and most common panel type, these are often called acoustical tiles), costs about $100. It contains galvanized-steel main beams, cross T-fittings, hanger wires, wall molding, hanger-wire screws and wall-molding screws. Systems and components are sold at home centers and lumberyards. Panels come in 2×2- and 2×4-ft. sizes. A good strategy for any space that needs to be well lit is to intersperse flat fluorescent fixtures and lenses among the regular opaque panels. Because mineral-fiber panels absorb sound well, they’re a good choice for a playroom. They can be painted with latex paint, while tin tiles take an oil-based paint. Installation is pretty straightforward, but because the system is cumbersome, it’s a two-person job. You attach the hanger wires to the ceiling joists with nails or screws, then suspend the main beams and cross T-fittings from them. The open metal grid is then filled in with panels. Forget the myth that this treatment results in a drastically lowered ceiling—the new one can hang down as little as 3 in. from the original.
Layered Drywall
In flexible, open floor plans, boundaries between living and dining areas are often hard to define; the usual strategy depends on furniture groupings and such fixed focal points as fireplaces and windows. Applying a simple border of single-thickness drywall to the ceiling emphasizes each area and boosts the architectural impact of the space without blocking light or casting shadows. This technique picks up on rectangular shapes and can be particularly effective if there’s raised-panel cabinetry or wainscoting in the room. Install the border with construction or panel adhesive and drywall screws that penetrate joists at least 1 in. Create crisp edges on the new layer of drywall with J-bead and then finish with joint compound.
Paneling
For a classic New England cottage look, you can’t beat a paneled ceiling. Among the several materials that create the effect are wood (plywood panels or solid-wood, tongue-and-groove board paneling) and mineral-fiber planks that imitate wood. Wood
In the plywood category, Georgia-Pacific makes a product called Ply-Bead that imitates old-fashioned bead board. It comes in 19/32- and 11/32-in. thicknesses. Suitable for both sloped and flat ceilings, the 4×8-ft., tongue-and-groove sheets have a pine top veneer that’s milled to look like bead board. The panels come in two patterns. Use the thinner, 1.6″ on center bead to visually enlarger smaller spaces, and the wider, 3.5″ one to shrink an area that’s too large. To finish off the edges of a beadboard ceiling, try pairing it with traditional crown molding. Ply-Bead costs $16 to $20 per sheet. The panels, which can be cut with a power saw or handsaw, should be nailed to the ceiling joists. Construction or panel adhesive provides extra insurance. Because of the size of the panels, it’s best to have a helper during installation. Opaque stains and acrylic latex paints over a primer can be used to achieve any number of looks. The former allows the wood grain to show through, but the latter is more durable. If sheet paneling is a little daunting, there are real-wood options at any lumber yard in nominal widths of 4 to 8 in. and in thicknesses of 3/8 in. to 3/4 in. Look for tongue-and-groove edges that are beveled to form a V-groove. This paneling is installed board by board with adhesive and blind nailing. Mineral-fiber “planks”
If you want that wood paneling look but don’t relish hoisting lumber overhead, consider fiber planks, which are similar in composition to acoustical tile but don’t require a suspended grid. Armstrong’s new Country Classic Planks are a good example. These 48-in.-long x 6-in.- wide planks weigh only 21 oz. each, making installation a simple, one-person task. The tongue-and-groove planks are easy to assemble, and can be attached directly to drywall or plaster with adhesive or staples. Costing about $1.25 per square foot, a carton covers 40 sq. ft. No visible seams or grid lines mar the surface of the ceiling. If the 6-in. width of Country Classic Planks doesn’t suit your space, you might want to look at Heritage Planks. These are scored down the middle to give the appearance of narrow, 3-in. boards. The wood-grain planks come white, which can help brighten a dark room. They also take well to painting for a variety of effects. You can even create featured panels within a ceiling by using several colors. Or you can stain the planks with a water-based gel for a wood look.
Where the Joists Are
Most ceiling treatments must be anchored to ceiling joists. To locate the joists, look in the attic to see what direction the joists are running and how far apart they are. Mark the location of one by driving a finishing nail along its side. From below, use a stud finder or rap lightly on the ceiling until you hear a solid sound you’ve found a joist. Locate the edges of the joist by nailing through the ceiling at small intervals. Mark the center, then measure over 16 in. (or the spacing you found in the attic) to find the center point of the next joist. Snap a chalkline along all joists; it will save you time and work later.
Where to find it:
Tin panels
A.A. Abbingdon
2149-51 Utica Ave.
Brooklyn, NY 11234
718/258-8333. Armstrong World Industries, Inc.
Building Products Division
Customer Response Center
Box 3210
Lancaster, PA 17604
800/233-3823. Charles Street Supply
54 Charles St.
Boston, MA 02114
800/382-4360 Chelsea Decorative Metal Company
9603 Moonlight
Houston, TX 77096
713/721-9200 Medallions
Decorators Supply Corp.
3610-12 S. Morgan St.
Chicago, IL 60609
773/847-6300. Felber Ornamental Plastering Corp.
Box 57, 1000 Washington St.
Norristown, PA 19404
800/392-6896 Focal Point Architectural Products
Box 93327
Atlanta, GA 30377-0327;
800/662-5550 Georgia-Pacific
133 Peachtree St. NE, 8th fl.
Atlanta, GA 30348-5605
800/284-5347. National Guild of Professional Paperhangers
136 S. Keowee
Dayton, OH 45402
800/254-6477 Style-Mark, Inc.
Box 301, 960 W. Barre Rd.
Archbold, OH 43502
800/446-3040 Sur La Table
800/243-0852